Parts of a Welding Symbol
A complete welding symbol is a system: the arrow identifies the joint, the reference line carries weld information, and an optional tail carries process, specification, or other references.
- Trace a callout to the correct joint before naming the weld
- Separate the jobs of the arrow, reference line, elementary symbol, dimensions, and tail
- Use one repeatable reading order on unfamiliar drawings
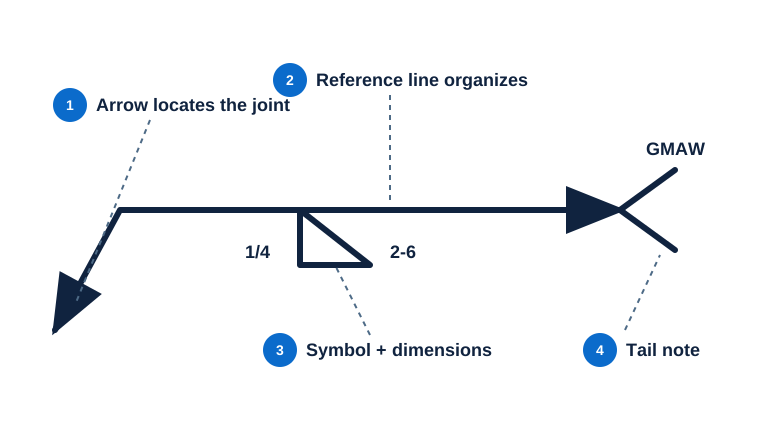
Starting in the middle
Most costly symbol-reading errors are context errors: the reader decodes a familiar mark correctly but applies it to the wrong joint, side, or note.
Three nearby joints. Only one belongs to the callout.
A bracket detail contains two plate edges, a stiffener intersection, and a process reference in the tail. The task is to establish the addressed joint before decoding any familiar mark.
Do not choose the closest dark line; follow the arrowhead to its actual termination.
Treat the tail entry as a supporting reference, not as the weld family.
If a component is absent, say that it is not specified instead of filling it in from habit.
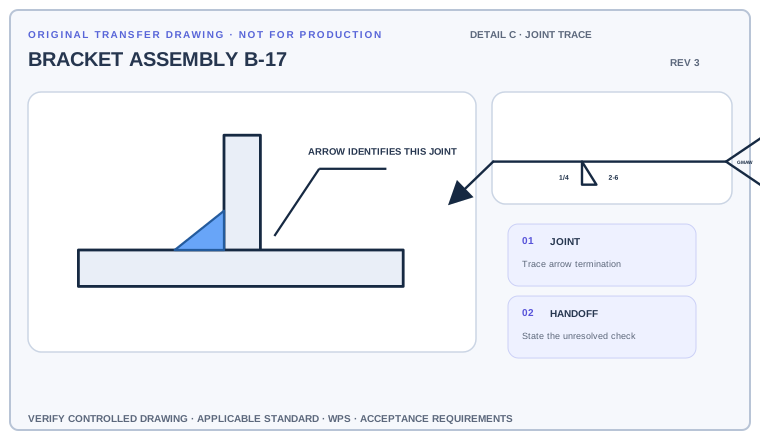
Circle the joint touched by the arrow, then write one shop-ready sentence that separates the arrow, reference line, elementary symbol, dimensions, and tail.
Deliverable · A one-sentence callout handoff with all five components assignedCompare with the field read +
The arrow selects the stiffener-to-base joint. The symbol and its placement define the weld and side, adjacent values define the amount, and the tail sends the reader to the supporting procedure reference.
Give each component one job—and no more
Begin with the cue in the first column. The final column records the drawing, detail, procedure, or acceptance question that this callout cannot answer by itself.
| Visual cue | What it establishes | What still needs verification |
|---|---|---|
| Arrow tip | Identifies the joint or member the instruction addresses | Do not assume it points to the whole part or the nearest line. |
| Reference line | Organizes weld type, side, dimensions, and supplementary marks | Above/below placement only makes sense after locating the joint. |
| Elementary symbol | Names the weld family or operation | It does not by itself define size, length, process, or acceptance. |
| Tail | May reference a process, WPS, specification, or note | A missing tail is normal; a present tail must not be skipped. |
A familiar triangle points into a crowded assembly
The print has several nearby edges and a tail containing a process reference.
Follow the arrow tip first, establish the joint and side, then decode the triangle and its adjacent values. Read the tail last as supporting information.
You can describe one complete instruction without turning the process note into the weld type or choosing the nearest visible edge.
Use the callout as a sentence, not a bag of icons
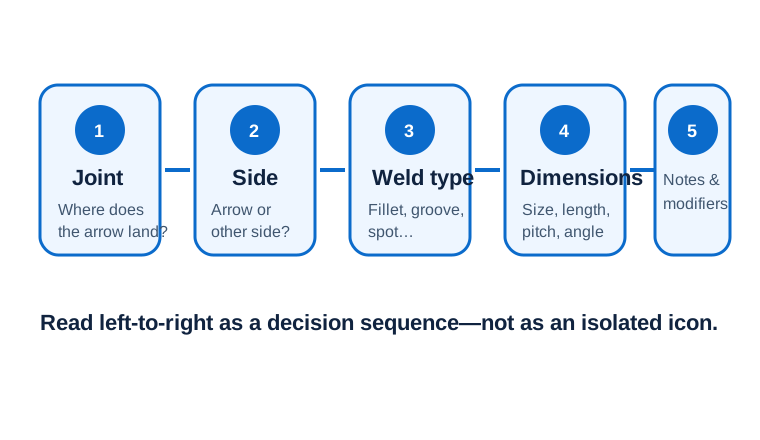
Read from the joint outward. Find the arrow tip, establish the arrow side, scan the reference line for the weld symbol and dimensions, then read supplementary marks and any tail note.
- Follow the arrow tip to the exact joint or member.
- Use the arrow to establish arrow side and other side.
- Identify the elementary weld symbol on the reference line.
- Read dimensions around that symbol before checking supplementary marks and the tail.
Separate the weld symbol from the complete welding symbol
Weld symbol
The elementary mark for a weld type
Evidence to useCan it stand alone without the arrow and reference line? Usually no.Welding symbol
The complete communication system
Evidence to useRead joint, side, type, dimensions, modifiers, and tail as one instruction.Where a familiar icon sends readers to the wrong joint
Starting in the middle
A correct symbol read against the wrong joint still produces the wrong instruction. Begin at the arrow tip.
Skipping the tail
A tail is optional, but when present it may point to a process, WPS, specification, or note that matters.
Mixing components
The arrow locates; the reference line organizes; the elementary symbol names the weld. Keep those jobs separate.
Can another person locate the same joint from your explanation?
Use the full list before fabrication, fit-up, or inspection. This is a drawing-reading handoff—not a substitute for the governing acceptance standard.
- 01Touch the exact joint at the arrow tip
- 02Say arrow side and other side out loud
- 03Name the elementary weld symbol
- 04Read every number by its position
- 05Check supplementary marks and the tail
Evidence and limits for this Symbol Anatomy lesson
This guide teaches common AWS-style drawing interpretation. It is educational material, not a substitute for the purchased standard, project specification, code, WPS, or qualified engineering direction.
How this page was made. The training diagrams, worked example, comparisons, and questions are original educational material. Read the editorial and technical review policy for the full process.
Save your place after Symbol Anatomy.
This marker records reading progress only; it does not mean the topic is mastered. Use the six-question practice page to check your understanding.
Build outward from Symbol Anatomy
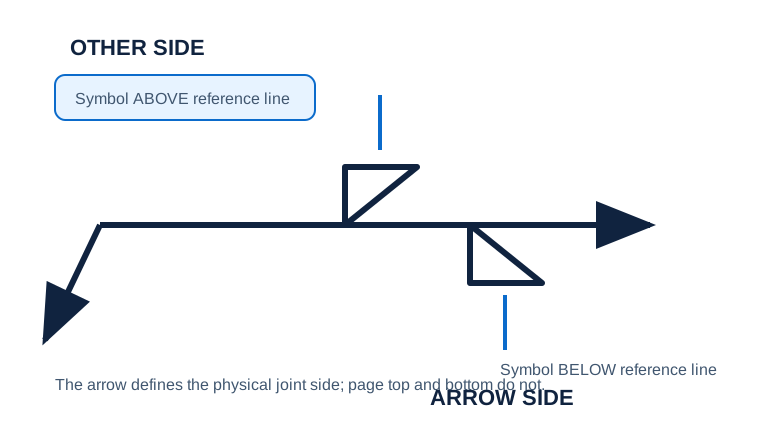 Arrow Side vs Other Side
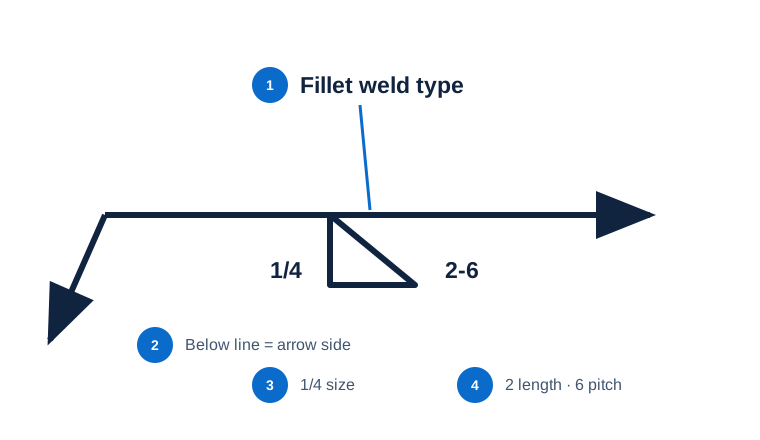 Fillet Weld
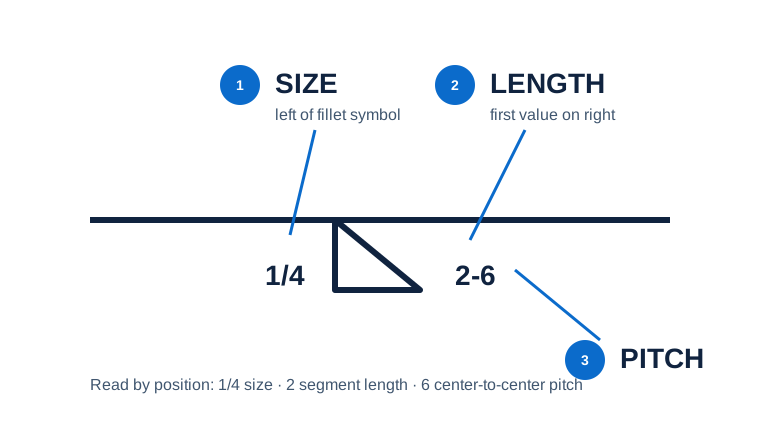 Size, Length & Pitch
Educational practice only. Verify production work against the governing drawing, applicable standard, WPS, and qualified instruction.